
How to improve your calligraphy skills?
Writing posture and writing method
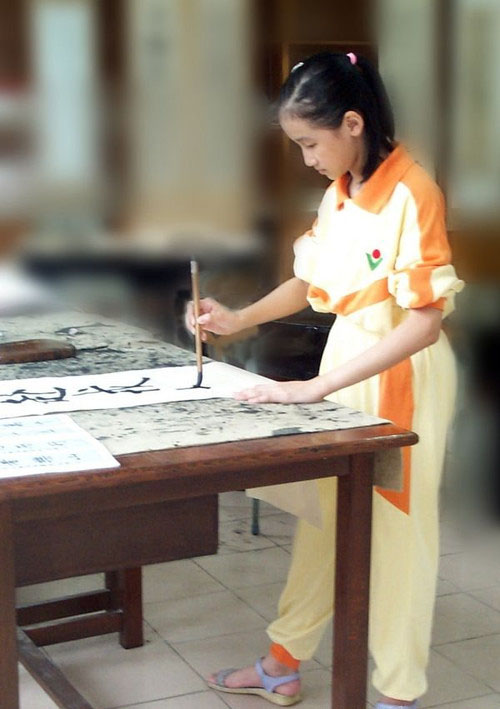
1. Writing posture
(1) Sitting posture
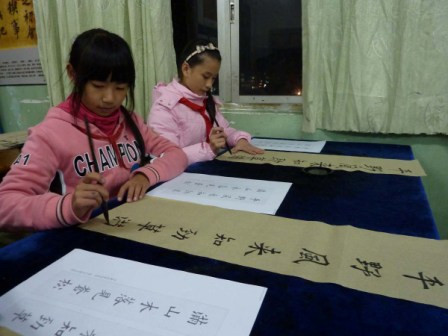
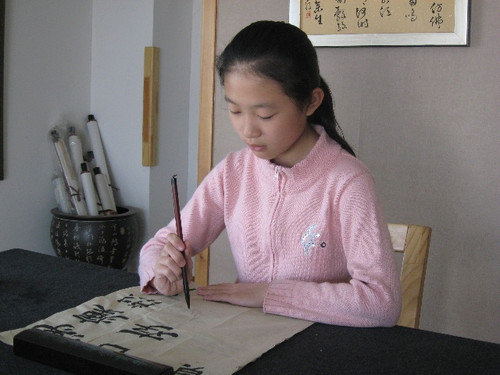
(2) Writing posture
2. Writing method
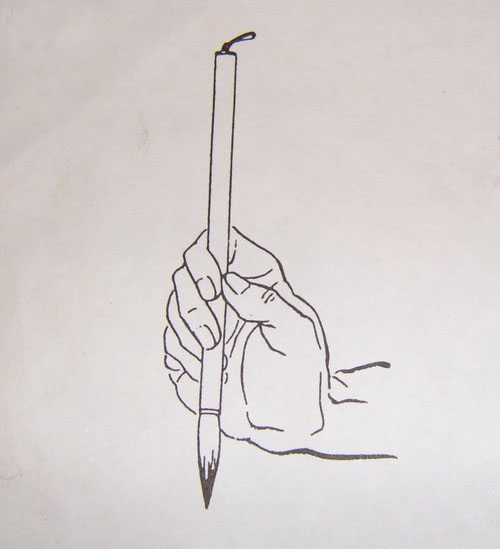
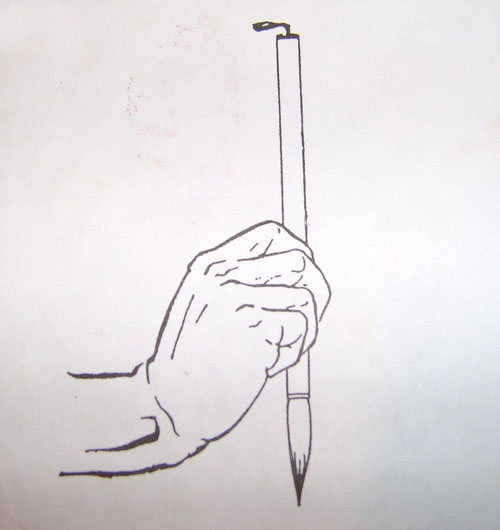
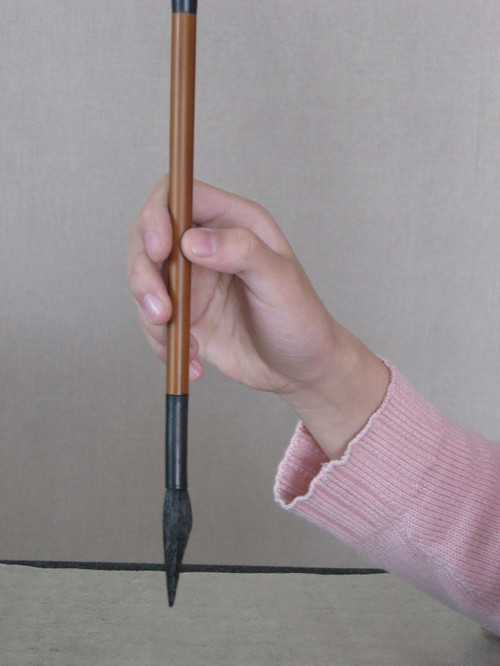
(1) The pen barrel is vertical
The pen is straight, which means that the pen barrel should be basically perpendicular to the paper surface to ensure that the center of the pen is stroked. Specifically, the pen barrel should be vertical to facilitate the adjustment of the direction of the eight-sided pen. It is worth pointing out that during the pen movement, as the wrist swings, the pen barrel will tilt in the direction pointed by the pen tip. For example, the pen barrel tilts to the left when writing horizontal drawings, and tilts forward when writing vertical drawings. This is completely reasonable, but the penholder must not be tilted toward the direction of the stroke to cause "drag", nor can it be tilted to both sides of the stroke to cause a slant.
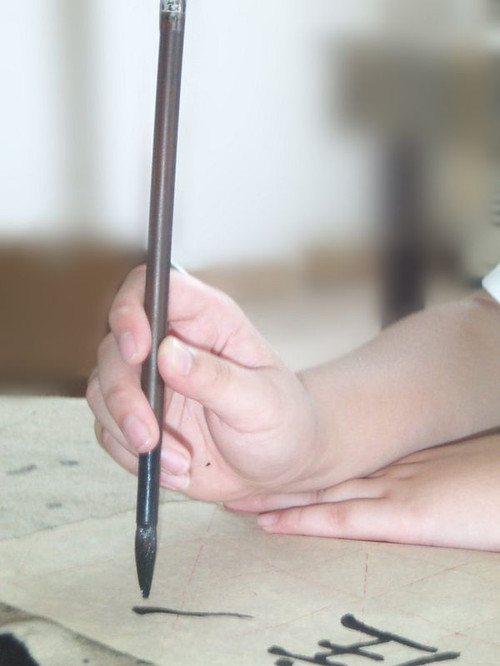
(2) Fingers are strong and palms are weak
Use your fingertips to pinch the pen, do not use your knuckles to hook the pen. Because the fingertips are sensitive, it is easy to control subtle changes in the pen edge. The pen should be held moderately tight with your fingers. Generally speaking, the smaller the characters you write, the tighter the pen should be, while the larger characters can be loosened. The pen should be held tighter in the sitting position while the pen can be held looser in the standing position.
Palm deficiency means that the palm should be empty when writing. The ring finger and little finger should not be held in the palm. The ancients said, "An empty body can accommodate an egg." That is to say, there should be an egg-sized space in the palm of the hand to facilitate the flexible movement of the fingers and joints.
(3) Natural relaxation
Holding the pen will be naturally relaxed, and the four joints of the fingers, wrists, elbows, and shoulders will be able to move flexibly, making it easy to write. For example, when using chopsticks to eat, if the chopsticks are held tightly, the food in the bowl will not be able to be picked into the mouth. The same is true for holding a pen.
If holding a pen mainly relies on the fingers, then moving the pen mainly relies on the wrist. Jiang Ling of the Song Dynasty said that "the pen is held in the hand, but the hand does not control the movement. The movement is in the wrist, and the wrist does not control the holding." The ways of moving the wrist are divided into pillowing the elbow and supporting the wrist, pillowing the elbow and hanging the wrist, and hanging the elbow and hanging the wrist. Pillowing the elbow and pillowing the wrist means that the elbow is pillowed on the table with some support under the wrist (usually calligraphers pillow their left hand under the right wrist). This method is used for writing small regular script. Pillowing the elbows and hanging the wrists means that the elbows are resting on the table and the wrists are in the air. This method is used in writing in Chinese, regular script or small running script. Hanging elbows and hanging wrists means that the elbows and wrists are all hanging in the air. It is often used for writing in running, cursive or large regular script.
Finally, there is the issue of the writing position. A brush, where is the right place to pinch it with your fingers? There is no absolute answer. The general principle is: when writing small characters and regular script, the writing position can be lower; when writing large characters or running or cursive script, the writing position can be higher, so that the pen tip can move widely and the strokes can flow flexibly.
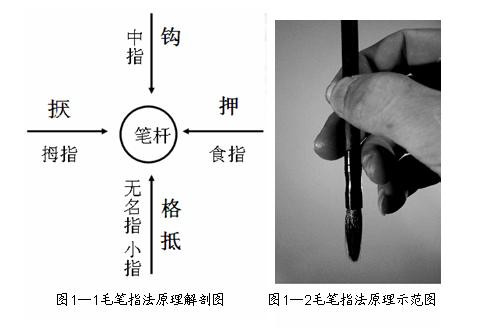
Below, we will introduce a specific writing method: the five-finger method. It is said to have been created by Lu Xisheng, a calligrapher of the Tang Dynasty. He used five characters to explain the functions of the five fingers in writing. The five characters are: Zhuo, Ya, Hook, Ge, and Dui.
(擫) is used to illustrate the function of the thumb. Place the thumb pad tightly against the left side of the pen holder.
(Press) is used to illustrate the function of the index finger. Place the pad of your index finger close to the right side of the penholder, and hold the penholder opposite your thumb.
(hook) is used to illustrate the function of the middle finger. The middle finger rests under the index finger, and the first joint is bent into a hook to hook the outside of the pen barrel.
(case) is used to illustrate the function of the ring finger. The ring finger is close to the pen barrel, and the middle finger hooks inward to block the pen barrel to prevent the pen barrel from tilting.
(to offset) Explain the function of the little finger. "Die" means padding, which means that the little finger is padded under the ring finger to increase the strength of the "grid" of the ring finger.
Basic stroke writing rules of regular script
Strokes are the basic elements that make up Chinese characters. If you want to write well, you must first write good strokes. Just like when building a house, you need to pay attention to the quality of the materials. A house built by cutting corners will definitely be a "tofu dregs" project. The same is true for writing. The learning method of writing directly without practicing the strokes seriously is not in line with the rules of learning brush regular script. . Wang Xizhi said: "...a slight loss of position is like a disease in a beautiful woman's eye; a loss of integrity in a painting is like a broken arm of a strong man." This fully illustrates the relationship between the quality of strokes and the overall beauty of calligraphy.
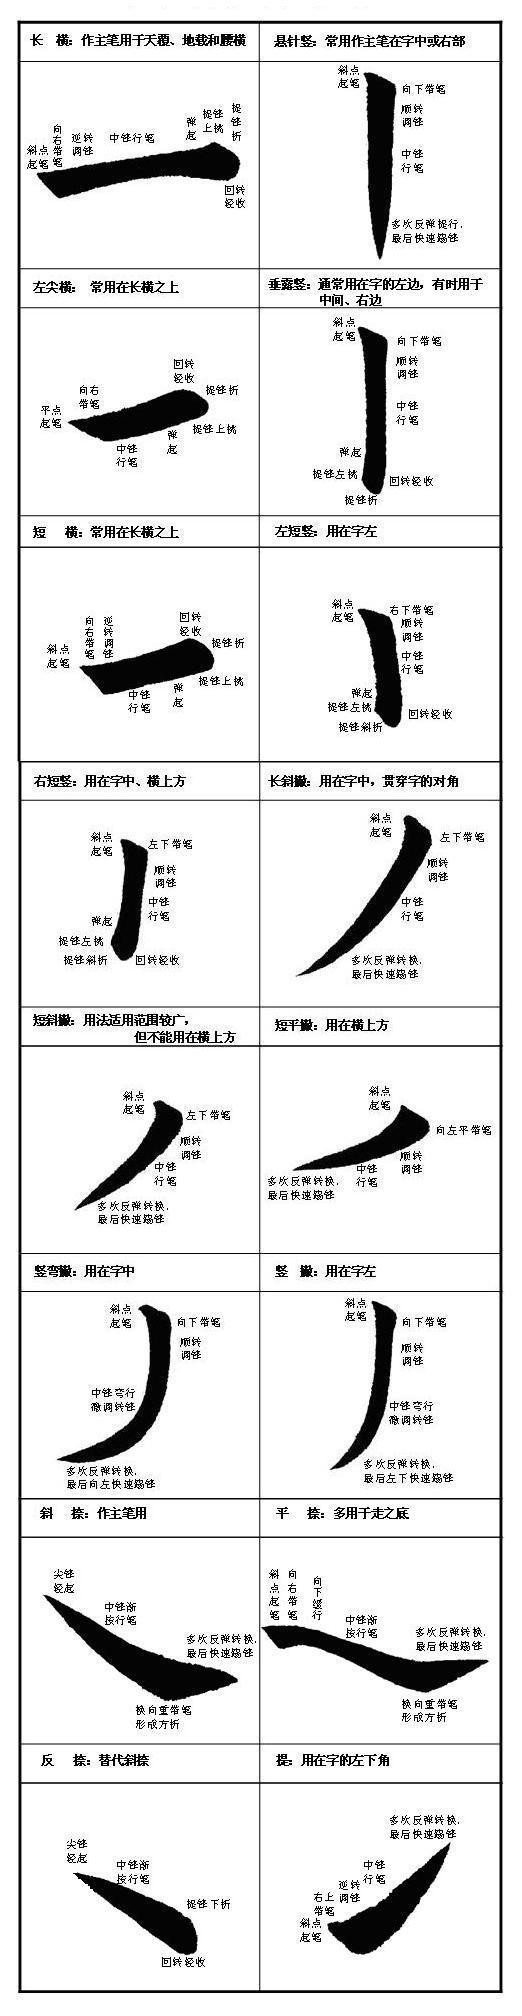
There are more than forty basic strokes in Chinese characters, which can be divided into dots (oblique dots, vertical dots, left dots, left dots, and raised dots), lines (long horizontal, short horizontal, left pointed horizontal, hanging needle vertical, and hanging vertical). , short vertical, long oblique, short oblique, short flat, vertical oblique, vertical oblique, oblique, flat, reverse, lift), fold (horizontal fold, vertical fold, offset fold), hook (horizontal fold) There are five categories: hook, vertical lift, vertical hook, oblique hook, horizontal hook, vertical curved hook, vertical left curved hook) and compound strokes (10 in total, names abbreviated). The writing method of each type of strokes is regular. , these rules are not difficult to master. The following are the rules I summarized in the process of learning and teaching regular calligraphy.
1. The rules of writing: point, lead, turn
It is suitable for the writing method of starting straight from one extension to the next. The reason why this writing method is taught is to facilitate students to learn running script in the future (see Figure 3-1). (If you can’t see the full picture, you can double-click on the picture to view it)
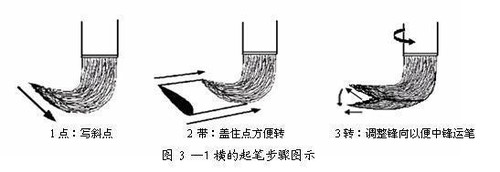
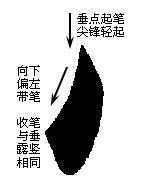
Dot: Any stroke starts from a dot. The penholder is vertical, and the pen is tilted (45°) (the default is this angle, and it can be adjusted accordingly for different styles of regular script). The pen is written from light to heavy to create an almond point with a sharp front and a round back. It is required that the stroke should be light and the angle should be oblique. The length of the point should be written according to the thickness of the stroke. Do not blindly stretch it to avoid causing trouble in the next step.
Band: It is used to write the outline of the starting point of the pen and to facilitate the transfer of the pen. Taking the horizontal direction as an example, after writing the almond dots, use the brush to move in the direction of the stroke (horizontally right, vertically downward, left downward, downward right, upward right) with the brush on the side to form a flat quadrilateral block. In this way, The outline of the starting point of the pen is written, and it is convenient for the pen tip to change directions without leaving any trace, ensuring the next step of the center stroke. Note: Do not lift the brush when carrying it. Cover the head and tail of the dot (subject to the head and tail of the dot being invisible), and write three straight sides and two square corners.
Turn: It is to adjust the direction of the pen tip to meet the requirements of the center. After the flat quadrilateral block is formed, there is no need to lift the tip of the pen, and then the thumb and index finger are used to turn the pen barrel counterclockwise (horizontal and lift are for counterclockwise rotation, and vertical and horizontal strokes are for clockwise rotation. Since the writing direction is the same as the point, there is no need to Turn), driving the pen tip to adjust counterclockwise, so that the original pen tip direction changes from forward to left. At this time, moving the pen to the right is a horizontal center stroke. Note: Do not lift the brush when turning the pen. Use your thumb and index finger to rotate the pen barrel directly to drive the pen tip to rotate on the paper, like a seesaw, so that the pen tip and pen heel touching the paper move toward the center of the stroke at the same time until the pen tip meets the center requirements. .
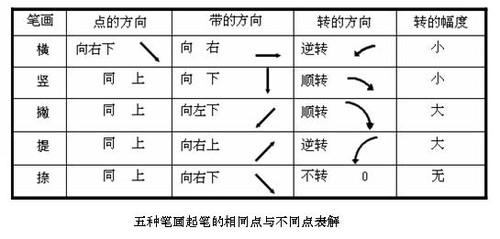
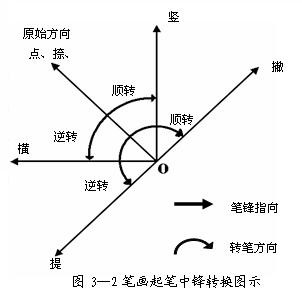
The above only uses the horizontal stroke as an example to illustrate the rules of starting point, leading and turning, and the starting point of other strokes can be deduced by analogy. As for the similarities and differences in the starting points, belts and turns of the five most basic strokes of horizontal, vertical, left, lift and hold, please see the table and (Figure 3-2).
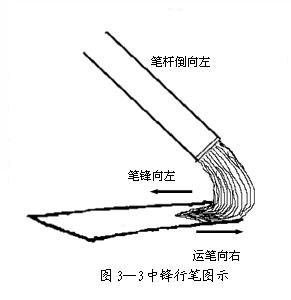
2. Rules of writing: center forward and fine strokes
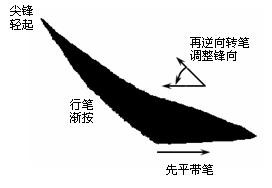
After the three steps of starting the stroke are completed, the center stroke is followed by the stroke. During the stroke process, the tip of the stroke must always be pointed in the opposite direction to the direction of the stroke. At the same time, the tip of the stroke must always be kept in the center of the stroke. With the movement of the wrist, the penholder can be inverted. In the direction pointed by the tip of the pen (not in the direction of the pen movement or to both sides of the stroke, otherwise it will cause drag or deflection), the greater the tilt of the pen tip, the greater the friction between the tip of the pen and the paper, and the pen will move forward against the resistance and write. The strokes are naturally powerful and beautiful (see Figure 3-3).
Please see the demonstration of stroke initiation and strokes
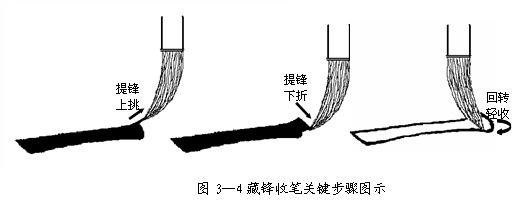
3. Pen collection rules
After finishing writing, the next step is to close the pen. There are two ways to close the pen:
(1) Zangfeng collects the pen: flick, pick, fold, and turn
When the center stroke reaches the end, the first step to close the pen is to rebound and lift the pen (the less elastic the pen or the wider the pen stroke, the more rebound and lift is required), because the strokes are horizontal, vertical or short vertical, and reverse. The finish requires lighter strokes to complete the finish successfully. Therefore, rebounding and lifting is a key step to successfully finish the pen. Here I use the word "bounce" to summarize this step of rebounding.
The second step of "picking" summarizes the upward stroke (for horizontal strokes) or the left stroke (for vertical strokes). The purpose of this step is to form edges and corners in conjunction with the third step of "folding" to emphasize the shape of the strokes. Effect. Note: When picking, use a one-point pen to pick lightly, and do not use heavy strokes.
The third step of "folding" summarizes that after the "picking" of the pen tip, the pen is folded (the direction is parallel to the direction of the starting point) to form a square corner to the lower right, which contrasts with the arc formed by the next step of turning to close the pen, forming a square circle. Note: This step still requires a light folding pen.
The fourth step of "turning" summarizes the circular recovery. After completing the "folding", the wrist drives the brush to easily turn the brush tip and gently retract it from below. The entire stroke is successfully completed.
This method can be used to close the pen if it is hanging vertically, short vertically, or reversed (see Figure 3-4).
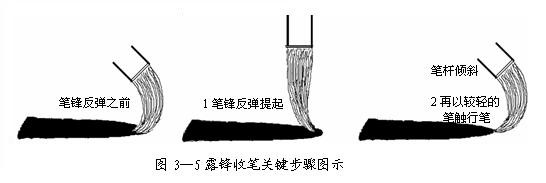
(2) Lu Feng closes the pen: flick, tilt, kick
The purpose of Lu Feng's closing of the pen is to write the pen edge. The same as closing the pen at Zangfeng, the first step also requires rebounding and lifting (this step is also called "bounce"). However, this rebounding and lifting is performed repeatedly and continuously, and the pen is moved lighter each time until the stroke is written. With repeated rebounds and lifting, in order for the pen tip to gradually close up, the pen tip must be tilted in the direction pointed by the pen tip (this step is called "tilting"). In the last step, the pen tip is quickly kicked out of the paper to form the pen tip (this step is called "tilting"). "Kick"). This method is used for all basic strokes such as the vertical strokes of the hanging needle, the strokes of the strokes, the strokes of the strokes, and the closing strokes of the hooks. What needs to be noted is: if you want to draw a beautiful stroke, you must turn the pen in place when starting the pen. Only when you turn the pen in place, can you write the stroke to the center line of the stroke when closing, thus producing a beautiful appearance (see Figure 3 - 5).
Attached: Regular script writing demonstration and usage
4. Two writing rules for folding
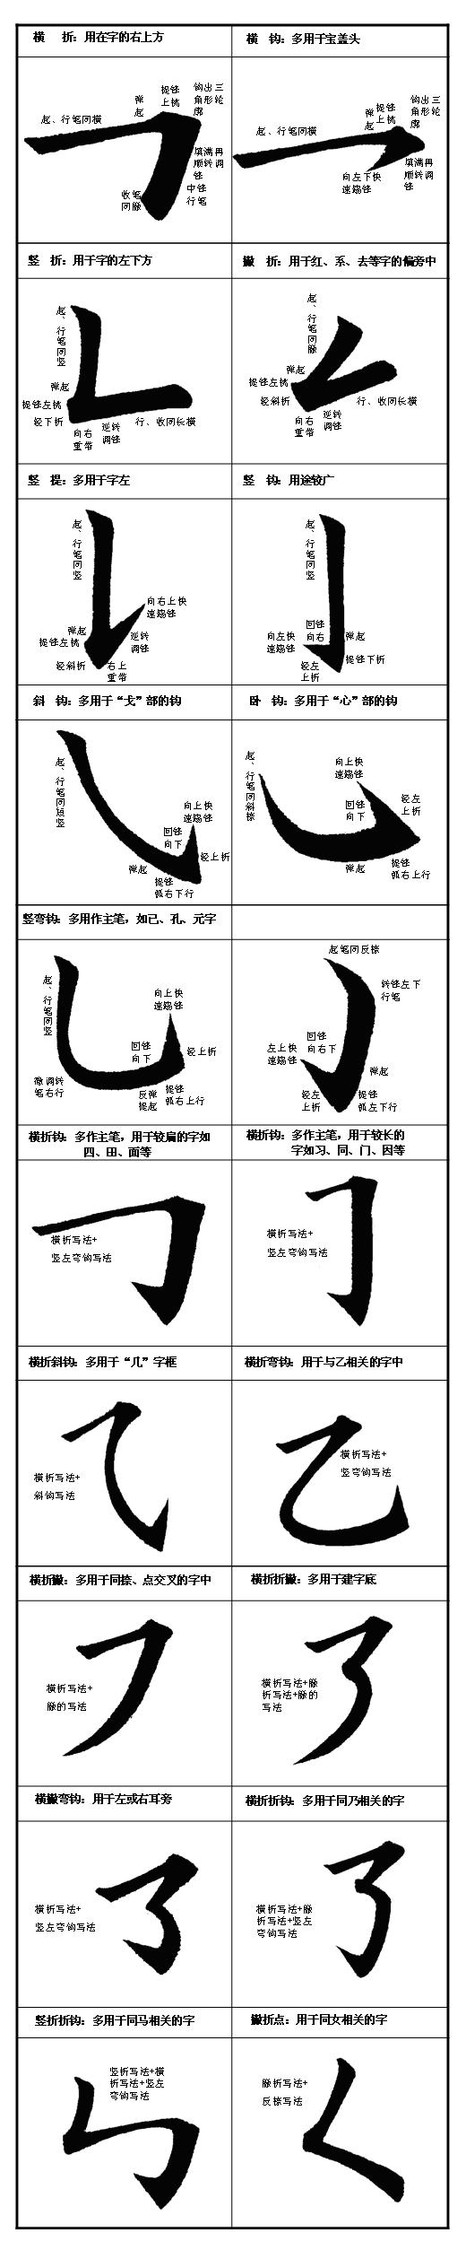
1. How to start and fold the pen - flick, pick, point, bring and turn
This method is the reduction method, which is especially suitable for writing vertical folds, offset folds and vertical lifts. It means that the fold pen can be regarded as the connection of two line strokes. For example, the horizontal fold can be regarded as the connection of horizontal and vertical (vertical fold can be regarded as The connection of vertical and horizontal strokes and folding can be seen as the connection of strokes and horizontal strokes, that is, the closing steps of the upper stroke are followed by the starting steps of the lower stroke), and the horizontal fold can be written as the horizontal closing of the stroke (retaining "bounce" and "picking", Remove "folding" and "turning") and then lift the pen vertically ("point, bring, turn"), vertical folding and skidding folding can be deduced in the same way (see Figure 3-6).
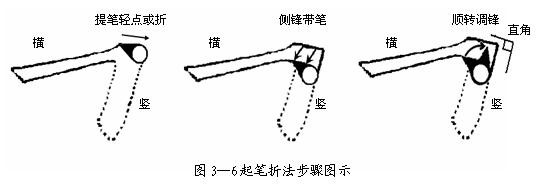
If you want the folded pen to have the effect of "consolidation and calmness" as Kang Youwei calls it, you must also pay attention to the folding pen angle within a right angle.
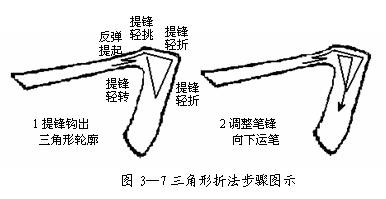
2. Triangle method - flick, pick, fold, fold and turn
The key to this method is to fold, fold and turn the hook to form the outline of the triangle in the last three steps, and then adjust the brush strokes. Especially suitable for writing horizontal folds, horizontal hooks,
The vertical hook is also particularly suitable for beginners. (See Figure 3-7).
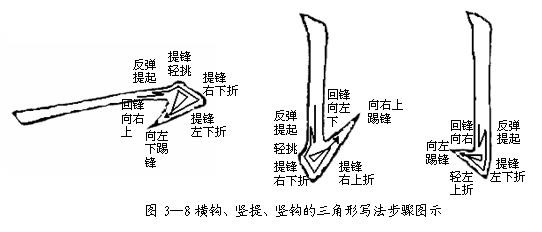
5. Writing rules for folding hooks
The writing rules for folding hooks (horizontal hooks, vertical lifts, and vertical hooks) are basically the same as the triangular folding method. Both can be written according to the five steps of "bounce, pick, fold, fold, and turn". However, the vertical hook should be written according to the "bounce, pick, fold, and turn" steps. It is more reasonable to write the four steps of "fold, fold, turn", because if the vertical hook also writes the same "heel" as the vertical lift, the effect will be ugly and cumbersome. Vertical lifting is more suitable for writing using the flick, pick, point, belt, and turn methods. (See Figure 3-8).
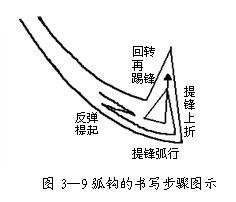
6. The writing rules of arc hook - flick, arc, fold and turn
The writing method of arc hooks (oblique hooks, horizontal hooks, vertical curved hooks, and vertical left curved hooks) is slightly different from that of folded hooks. If written in the triangle method, there will be an extra corner on the back of the hook, which is particularly ugly, so use "Arc". "replaces the two steps of "picking and folding" to fold the hook. In this way, the arc hook written can be
There is beauty. The writing rules of arc hooks can be summarized by the four words "bounce, arc, fold, and turn" (see Figure 3-9).
Attached: Regular script writing demonstration and usage
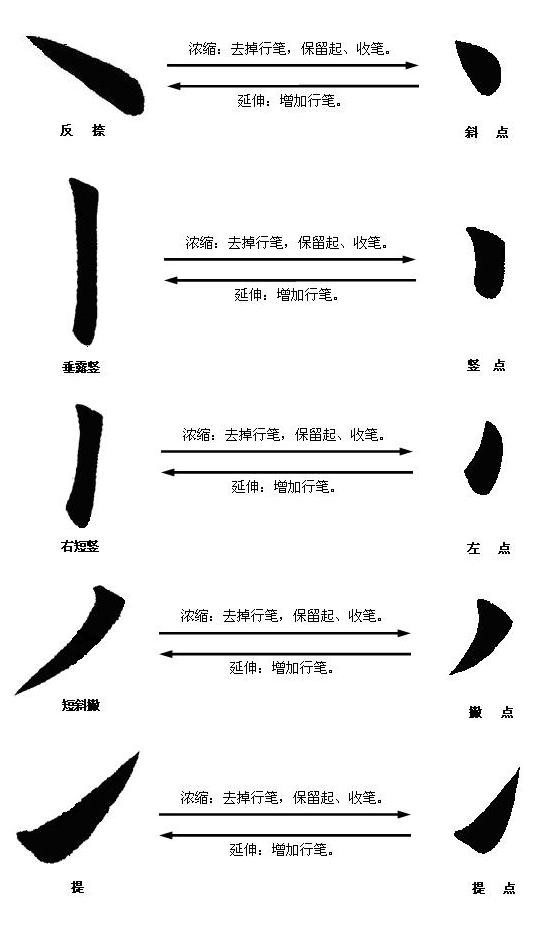
7. The writing rules of dots - the concentration of lines (line strokes)
There are five basic points in regular script:
Inclined Point - Condensation of Counterinhibition
Vertical point - the concentration of vertical dew
Left point - Condensation of the right short vertical
Skim Point - Condensation of short slant skim
Tips - condensed tips
These dots are abbreviations for the five corresponding strokes - go to the middle to start the stroke, connect the two ends to start the stroke, and close the stroke.
Tips on writing difficult strokes 1
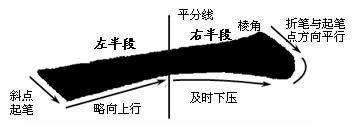
1. Long horizontal writing In addition to the general rules of starting, extending and closing the pen, you should also pay attention to the following points: 1. Arch shape. The left half is slightly tilted upward, and the angle with the horizontal line is about 5°. The right half is flattened in time just after the stroke passes the left half, and it naturally has an arched shape when the stroke is closed. 2. The middle section is slightly thinner. When writing, raise the tip of the pen slightly, and the strokes will naturally become thinner, but not too thin, otherwise it will become a "wasp-waisted" pen. 3. Close the pen with the top and bottom circles. The "picking" and "folding" of the closing strokes form square corners, which makes the horizontal strokes suddenly full of energy; the final "turning" must be rounded to form a contrast with the square corners, which is both harmonious and varied.
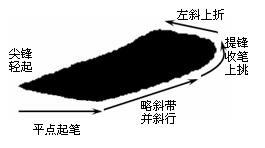
2. The left point is horizontal 1. The writing point should be horizontal and left pointed. After adjusting the pen tip, move it down in the horizontal direction from light to heavy (your finger should be sensitive to the weight of the pen), and slightly elongate it to form an almond point with a sharp left and a rounded right. 2. Close the pen and lift it up. After the rebound conversion tip is lifted, the tip extends forward and upward from the lower edge, then folds upward to the left to remain parallel to the lower edge of the starting pen, and finally closes the tip from the top. 3. The strokes are low on the left and high on the right. It is the same as the long horizontal and slightly diagonal pen. After holding the pen, keep the diagonal direction and write directly (since the flat point of the starting pen has reached the horizontal center pen movement requirement, the step of turning the pen to the front is omitted and the pen is drawn directly). After closing the pen, it must be Left is low, right is high.
3. Hanging needle vertically 1. The closing point should be in the center. When the pen is closed, the tip of the pen should be on the central axis of the stroke. This requires that the pen should be in place when starting and turning to ensure that the direction of the pen tip points straight forward and is in the center of the stroke. 2. The strokes should be full. The brush strokes should be written to three-quarters or four-fifths of the entire stroke before the brush can be lifted. 3. The closing movement is small. The range of rebound and conversion movements should be small, so that the strokes written can be delicate and neat.
4. Short and flat strokes 1. The angle should be flat. It depends on the direction of holding the pen, so after clicking, you should hold the pen gently to the left instead of holding the pen diagonally. 2. Turn the pen to become larger. Subsequently, the pen turning range increases, and the pen edge turns from forward to the left to to the right, and the written strokes are naturally flatter (no absolute horizontality is required).
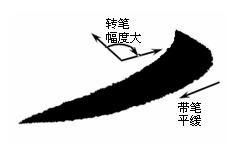
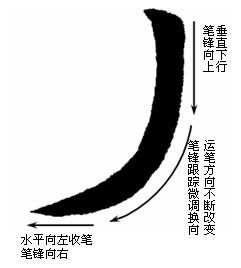
5. Vertical bend 1. Large turning range. From the vertical downward direction when starting the pen to the horizontal left direction when the pen is closed, the turning of the pen tip is controlled by the flexible rotation of the wrist. 2. The direction of the front should be tracked. Since the turning range is large, the pen tip direction must be adjusted by twisting the pen barrel clockwise with your fingers when turning. Otherwise, the strokes become thicker and uncoordinated when writing around corners. 3. Wrist rotation and finger twisting should be performed simultaneously.
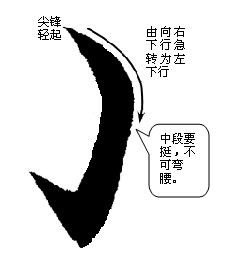
6. Oblique press 1. Press the lower part of the corner of the foot and make a circle. Here, use the long horizontal stroke method to draw and turn the pen, that is, when changing direction, maintain the original pen pressure and draw the pen horizontally to the right, creating the effect of a lower and upward circle. 2. Pressing your feet will make you plump and upright. The reversal of the pen strokes just mentioned is also a key step to achieve fullness. Then turn the pen counterclockwise to adjust the front and then close the pen in the center. The strokes written will be natural and full of energy, giving people a sense of beauty.
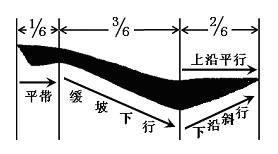
7. Flat stroke 1. Use the horizontal dotted method when starting the pen. Be careful not to be thick, long, or slanted, but should be slightly thin, short, and flat. 2. The second section of the downhill slope should be long, gentle and not steep. 3. The upper edge of the foot should be slightly longer and flat.
Stroke writing video
Tips on Tips on Writing Difficult Strokes 2
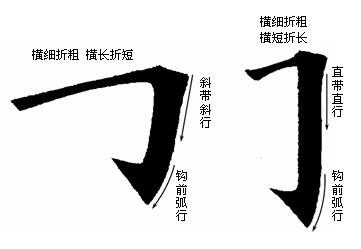
8. Vertical hook 1. The hook should be flat. The upper edge of the hook should not be inclined upward to the left, but should be slightly flat. 2. Don’t pick. After rebounding and lifting, don't lift the pen tip downward to avoid an unsightly heel.
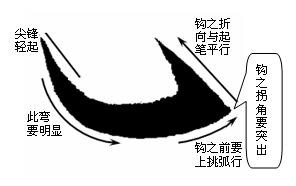
9. Lying hook 1. Lift up before removing the hook. Otherwise, it will be the same as an oblique hook, and it will be easy to write the hook large and empty, making it difficult to arrange the position of the point. 2. The hook should be long. The hook is long and parallel to the stroke, so that the hook is compact and small. 3. The corner of the hook should be prominent. If the corner of the hook is not prominent, it will be dull. The corners of other arc hooks must also be prominent.
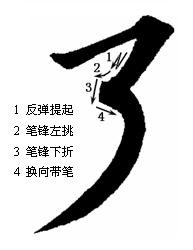
10. Vertical left hook: It is better to hunch over than bend over. Start the pen and go down right, then turn sharply to the left and go down, using both circles in the corners, just like a hunchback, but without bending, it is harmless. If it is written in a semicircle, as if bending down, it will give a feeling of weakness and weakness.
11. Horizontal fold hook 1. Fold the horizontal thin hook into the thick hook. The horizontal strokes should be written with the pen, and the folds should be written with the strokes. Do not fold the horizontal strokes thickly and fold thinly, or the horizontal folds should be equal in thickness. 2. The hook should be an arc hook. Draw an arc before pulling out the hook, that is, use the writing method of vertical left curved hook. Do not write it as a tuck hook or a heeled hook. 3. There must be changes. The horizontal folding hook can be written in different lengths and lengths according to different characters. For example, the horizontal fold length requirements for the hooks of "tong", "four" and "sentence" are different. It should be handled flexibly and not be the same.
12. Horizontal folding and folding are composed of horizontal folding and folding and folding. The horizontal fold and hook fold method are the same.
13. The vertical folding hook is composed of vertical folding and horizontal folding hooks. Note that the horizontal folding hook should be thinner, and the horizontal folding fold can be written as a circular fold.
14. Left point Use the vertical point method to start the pen. That is, write vertically from light to overwriting point, then bring the pen downward (slightly to the left), and close the pen in the same way as the vertical stroke. If viewed sideways from the back, it becomes a left pointed horizontal, indicating that it is consistent with the writing rules of a left pointed horizontal.
Stroke writing video
How to use and write combination points
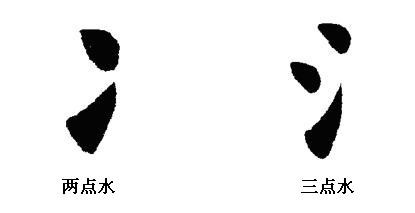
1. Two points of water: used as the left radical. The upper part is the inclined point and the lower part is the lifting point. This radical is generally used on the left side of a character, so the right edge should be aligned vertically. This is to prevent the mention from being too long and occupying the space on the right side.
2. Three points of water: used as the left radical. Add another slant point between the two points of water. This point should be close to the first point and aligned diagonally, so that it can be extended to the blank area left by the point and the pen to ensure that the right edge is vertically aligned. The principle is the same as above.
How to use and write combination points
1. Two points of water: used as the left radical. The upper part is the inclined point and the lower part is the lifting point. This radical is generally used on the left side of a character, so the right edge should be aligned vertically. This is to prevent the mention from being too long and occupying the space on the right side.
2. Three points of water: used as the left radical. Add another slant point between the two points of water. This point should be close to the first point and aligned diagonally, so that it can be extended to the blank area left by the point and the pen to ensure that the right edge is vertically aligned. The principle is the same as above.
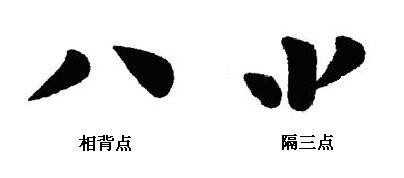
5. Opposite point: used as the base of characters. The left is a left point, the right is an oblique point, and the starting point of the pen is flush to ensure that the upper edge is neat.
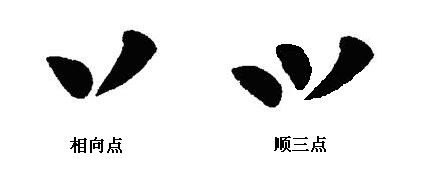
6. Every three dots: used as prefix. Insert a vertical dot between the opposite points. The stroke order is the middle first, then the two sides.
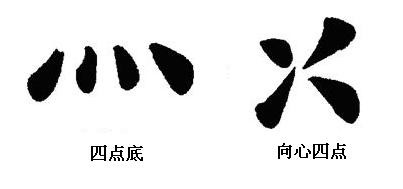
7. Four-point base: used as the base of characters. Written according to the principle of symmetrical radiation distribution, the two points on the left are left points, the two points on the right are oblique points, the two points in the middle should be slightly smaller and vertical, the two points on both sides should be slightly longer and oblique, and the upper edge should be neat.
8. Centripetal four points: used on both sides of the word. On the left are two dots of water, and on the right are a skewed point and an oblique point. The lower right bevel is slightly larger.
The rules of stroke after stroke
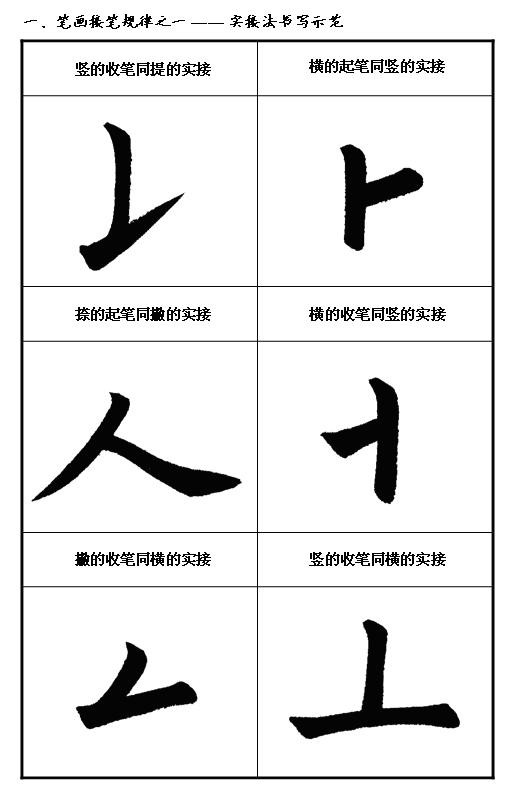
(1) Connection method
1. Actual connection method: the start or end of one stroke is covered by another stroke. This method is like a carpenter joining tenons. The two pieces of wood must be joined tightly and firmly, so that the furniture made can be strong and durable.
2. Virtual connection method: the starting or closing stroke of one stroke matches another stroke. The effect of writing is ethereal. This method is the key skill in the connecting method, because most calligraphers are not good at using this method to express the higher-level beauty of calligraphy. To master this method, you must master the two techniques of lightly lifting the sharp edge of the strokes and closing the strokes with the exposed edge.
3. Intersection method: two strokes intersect with each other. This method is relatively simple. No special practice is required.
(2) Phase separation method
The two strokes are separated from each other, but they are connected in meaning. Many people only pay attention to the writing and ignore the meaning. Little do they know that the broken pieces without meaning are just a mess, and the written words have no cohesion and lack a sense of wholeness. This method requires that when writing, the intention comes first and the writing is done in one go. Do not think or hesitate while writing.
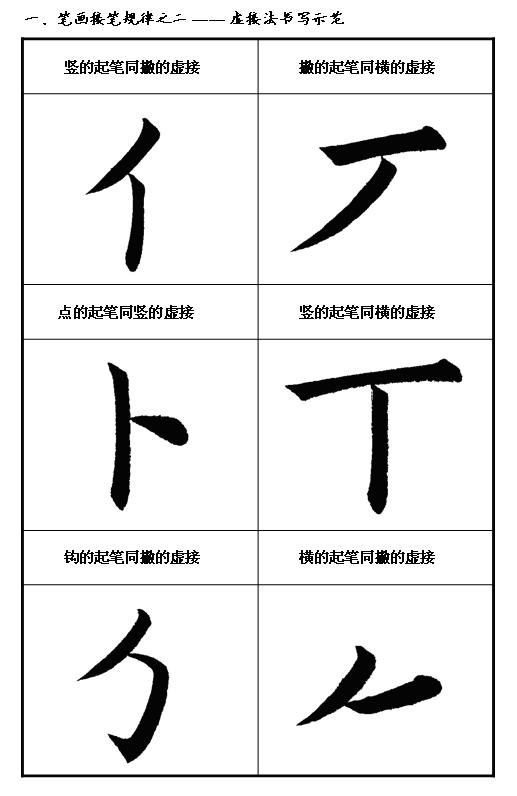

Demonstration of writing virtual connection method
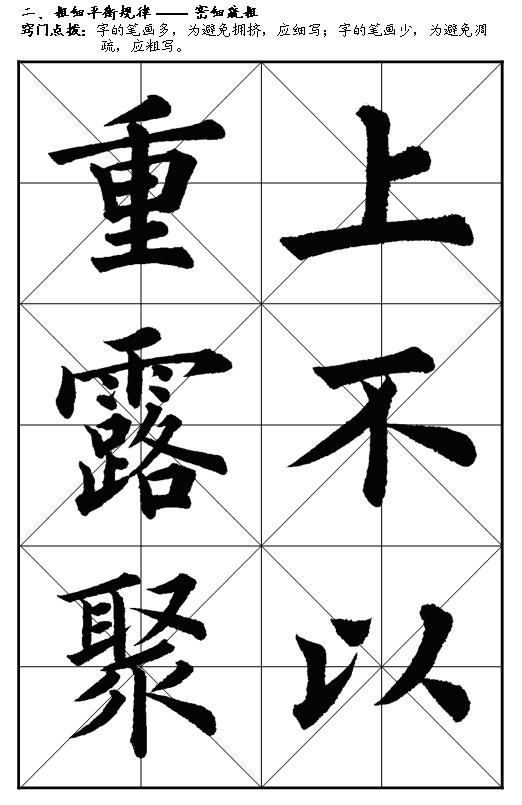
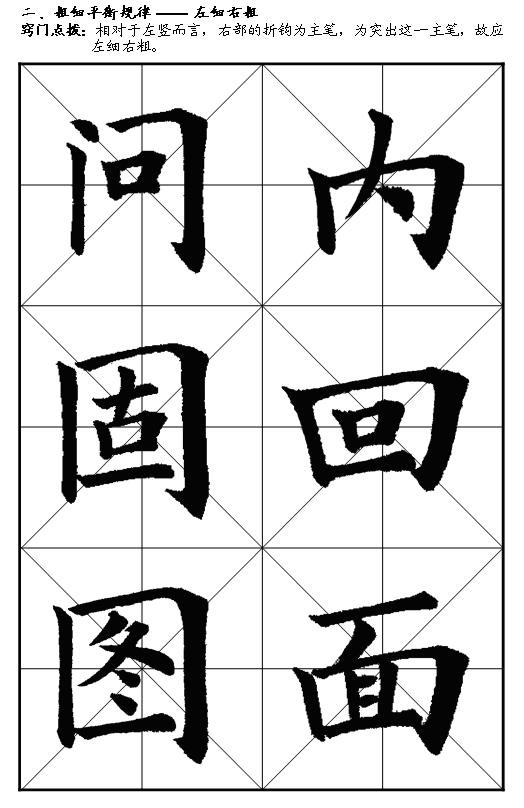
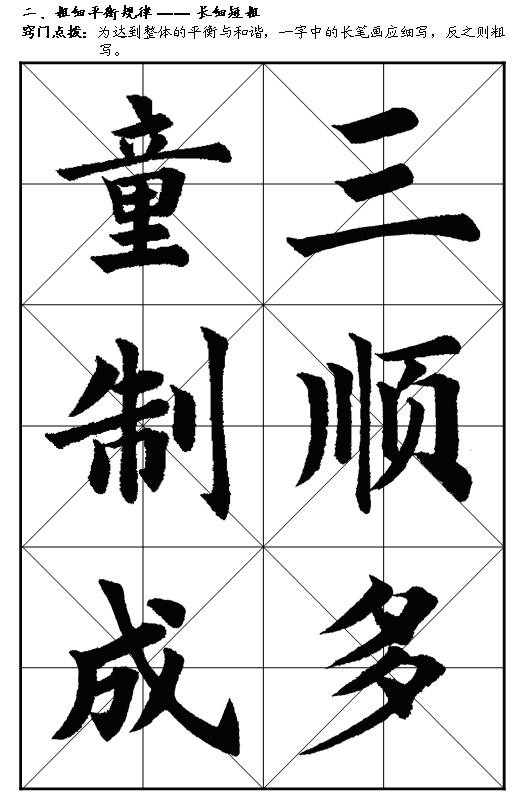
law of thick and thin balance
(1) Dense, thin, and sparsely coarse. In order to write a word with many strokes in the center of the grid without being crowded, the strokes must be thinner. On the contrary, although a word with few strokes can easily be written in the center of the grid, if it is also written thinly, it will feel frugal, so Write boldly.
(2) Long, thin and short. Beginners always ignore this rule when they encounter long and short strokes in writing. Either long and short strokes have the same thickness, or they are short and thin and long and thick. Writing this way does not conform to the principle of visual balance. Compared with short strokes, long strokes have greater visual tension, that is, they are more conspicuous than short strokes. Only by writing them thinner than short strokes, Only in this way can the short strokes be more conspicuous, thereby achieving visual balance.
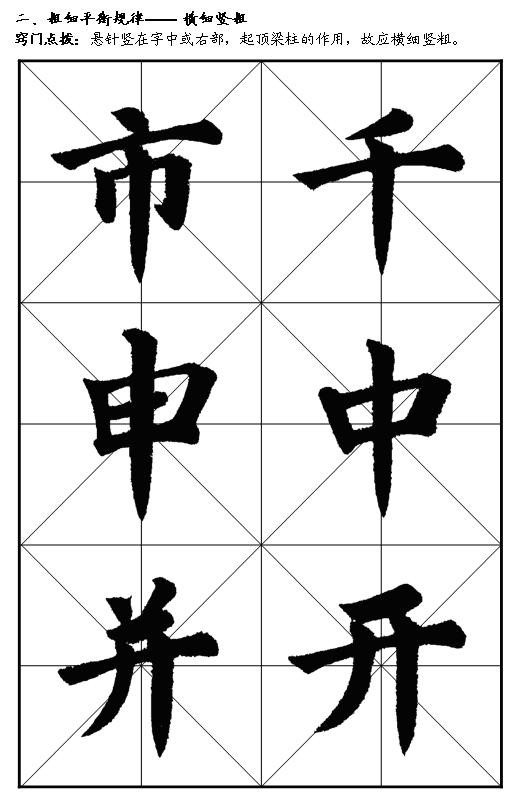
(3) Thin horizontally and thick vertically. This can be explained by the principles in architecture. The horizontal direction is equivalent to the beams, and the vertical direction is equivalent to the top beams. If the roof beams are thin and the roof beams are thick, it will give people a feeling of instability. Only by making the roof beams thicker and the roof beams thinner can there be a sense of stability.
(4) Thin on the left and thick on the right. This means that both the left and right sides of the word are vertical, because writing this way is in line with people's aesthetic and psychological habits.
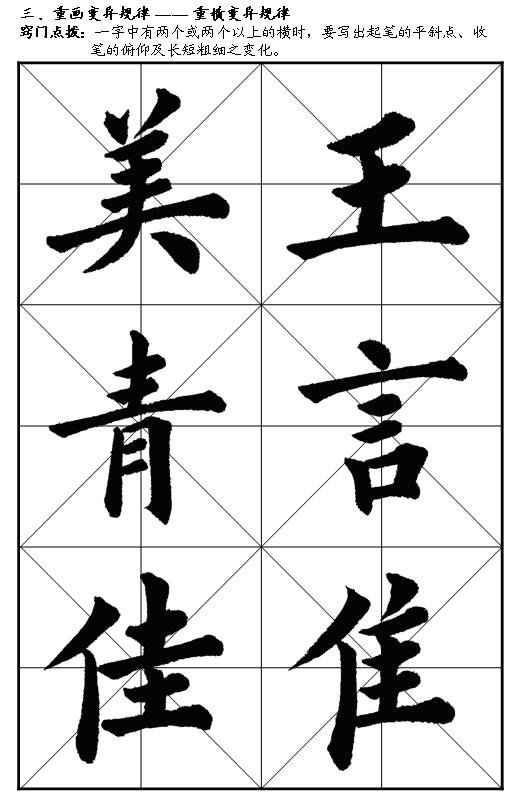
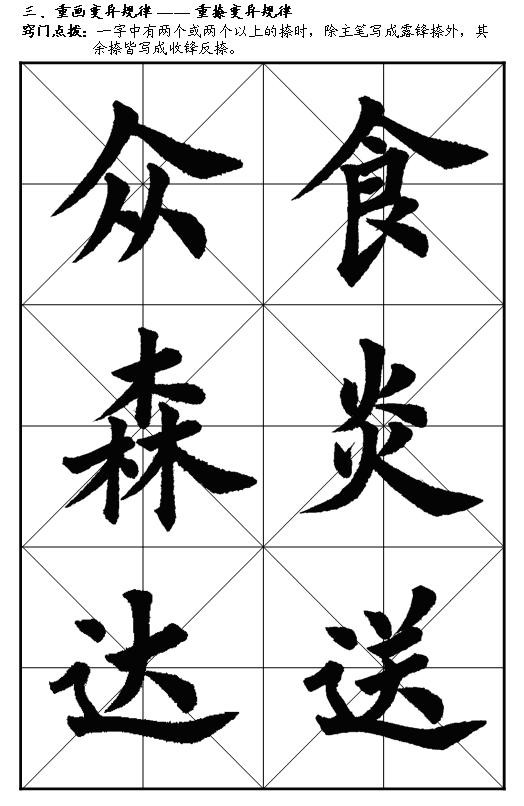
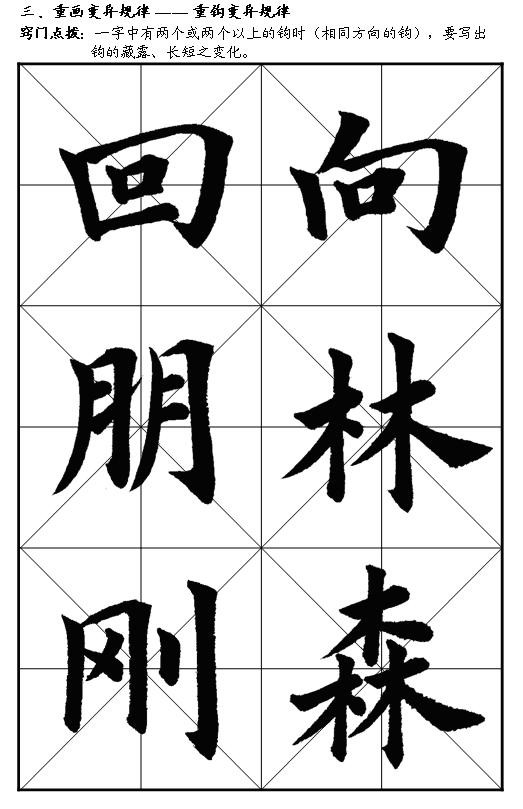
Redraw variation rules
(1) Variation rules of horizontal strokes: when there are two or more horizontal strokes in a character, the changes in the horizontal closing and vertical points of the starting stroke, the pitch of the stroke, and the length and thickness must be written;
(2) The law of variation of "na": When there are two or more "na" in a character, except for the main stroke which is written as oblique "na", the rest are written as "reverse", because this way of writing can highlight the theme strokes and make the whole character clear in priority. This is what the ancients said: "There are no two words in a word".
(3) Variation rules of double folds: If there are two or more folds in a stroke or a word, the changes in the square and circle should be written, so as to break the monotony and balance hardness and softness. Such as horizontal folding , horizontal folding, vertical folding and "horse".
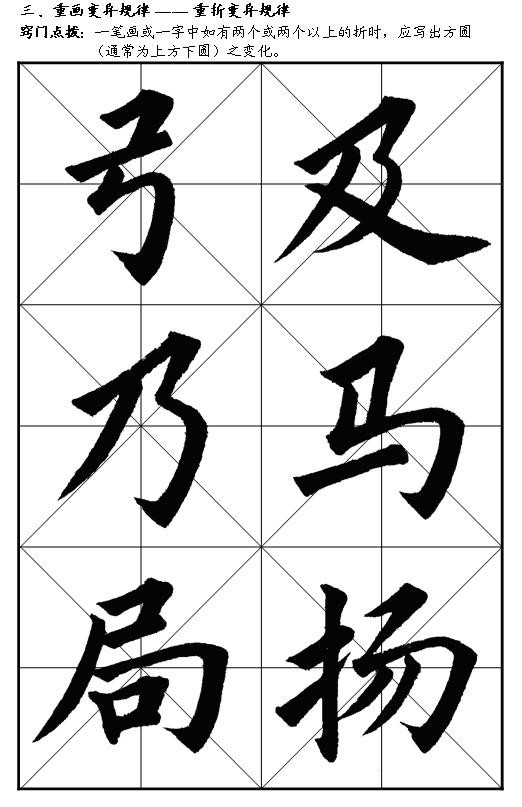
(4) Variation rules of heavy hooks: When there are two or more hooks in a word (hooks in the same direction), the changes in the hook's appearance and size must be written;
Regular script introductory textbook 2
Main writer priority rule
Why do many beginners write in regular script and in an old-fashioned way? Because I don't understand this important rule, writing regular script is like making calculations. If you want to make regular script writing lively and thought-provoking, mastering this rule is the main way.
The main stroke is the theme stroke in a word. There is only one theme stroke in a word, and the other strokes are all subordinate strokes. The subordinate strokes should give way to the main stroke, and should not dominate or occupy space. They can only highlight the main stroke. Compared with subordinate strokes, the main stroke takes up more space. Therefore, when writing the main pen, you should open it up and relax, and when writing the secondary pen, you should restrain contraction. This is the law of priority for the main writer. The main strokes in the basic strokes include long horizontal, hanging needle vertical, oblique stroke, horizontal hook, vertical hook, oblique hook, horizontal folding hook, horizontal folding oblique hook, vertical curved hook, vertical folding hook, etc.
A combination with long horizontal strokes as the main stroke

If the heart is upright, the pen will be upright, and the pen will be written in the heart.
The writing stays true to the point, and the turns are precious and round.
If there is something hanging down, you want to take it back. Avoid being mediocre in your outline.
The left hanging needle should be exposed vertically, and the right straight needle should be hung sharply.
The force of the sword is like a golden sword, and the shape of the sword is like a rhinoceros horn.
The front is running horizontally and the work is restrained, and the structural energy wants to be clear.
There is no slack at all, and the layout is clever and careful.
Denseness and density must be alternated, and slowness and speed will lead to passage.
Support each other in both light and heavy matters, and look forward to the situation in the right direction.
It is easy for shades to contrast with each other, and the back must be moderate.
Both reality and reality must be taken into consideration, and the ups and downs are continuous.
Intersperse potential vertically and horizontally, and give in in a measured way.
If you guide it, the spring will flow; if you pause it, the mountain will be revered.
She has both spirit and form, elegant and unrestrained appearance.
He keeps writing day after day, and his unremitting efforts lead to success.
regular script formula
Regular script is called Zhengkai, and there are many sharp edges when starting the pen
To learn books, you must first take the lead; when writing, you must use the center
The shape of the strokes should be stable and the return should be natural.
Every word must be correct and the structure should be emphasized.
The structure is evenly matched. Duolin's ancient posts
Pay attention to the composition and techniques of writing
The pen must be in place and regular script must be written well
Clear and clear must be neat and tidy. The most important thing is to use your wrists
Running script formula
Writing in regular script must be smooth. Calmness of the main writer is the key.
Simplification is the characteristic of fast writing. The continuous strokes are light and thin but not thick.
It has great flexibility and many variations. It is best to use a Changfeng pen.
The pen is used like cursive writing, so the ink must be moistened
When writing, you must raise your elbows. The beginning of the entire article is the standard.
To be flexible and changeable is to be free, to be coherent

official script formula
Fang Jin is ancient and clumsy, like a turtle or a turtle
Silkworm head and wild goose tail, the pen must be 30% off
Geese don't fly together, silkworms don't have two colors
Pointillism pitching left and right
Emphasis on turbidity and lightness on purity, decisively
Wei steel formula
Strong courage and flying spirit
The weather is quiet and the interest is high.
The brushwork jumps and the bones and blood are smooth
Stipples are thick and thick, the structure is natural
Elegant mood, rich flesh and blood
cursive script
The cursive script moves like spring earthworms, and the characters are shaped like autumn snakes.
The whole chapter must be understood together. It is a masterpiece that has spirit and spirit.
Kuangcao wants to decide
The wild grass is like electric turbulence, and every word is like a startled snake coming out of its hole.
The dots and lines change beautifully, and there are numerous density, density, virtuality and solidity.
Majestic and diverse, the structure is white and the heart is free.


